Add an arduino Library using the project menu

There are two settings to apply when configuring an arduino sketch to be recognized in visual studio as a c++ file. Both settings are accessed in visual studio via tools>options
Register pde (sketch) as a C++ file allowing both arduino intellisense and code formatting to be displayed/applied
This setting is not required if you are using Arduino for Visual Studio. The reference here is for information purposed only.
2nd may please see archive for visual studio 2010 intellisense ardupilot overview
The visual micro addin provides intellisense using visual studio for all arduino core, library and your own project files
If you add or link your own files to a visual micro project and the intellisense doesn't detect them. Just click compile on the tool bar (or rebuild the vs project)
Click CTRL+J in your code to see a master list of properties. See example...
When switching board, when adding an arduino library or when you add or link multiple existing files to a project you will see the background progress for the intellisense update
If your arduino intellisense stops working (somestimes happens with visual studio) then shutdown visual studio and delete the .ncb file of the project (it's in the projects folder). Important - Only delete the .ncb!
You may add any of the visual micro arduino commands to the visual studio tool bars and menus. You may also reference the commands in your visual studio macros. Serial ports, libraries, boards are also available as commands.
Example
The "Arduino Mega" will appear as a visual studio command (Tools, Customise), COM23 (if it exists) will also appear as a command, the SoftwareSerial library will also appear as a command.
Therefore you could add there new tool bar buttons for each providing a "one click" option to select options you use regularly. or you can create a workflow (macro) that automatically selects the "mega" board, sets COM23 and includes the software serial library into the current project.
Example: Customise Visual Studio Arduino Commands
Unsupported Upload Note
The compiler outputs .hex files into the <project>\_vsaddin\_build folder. The addin projects can be run from the visual studio command line. This makes it possible to design windows applications using visual stuidio that upload different arduino sketches based upon conditional factors. If you use the arduino visual studio compiler or the arduino uploader then please beaware that no liability is accepted by us and that you will break your arduino warranty
This page is a simple list of documents that will help you start programming Arduino using the Visual Studio development system
2011 new release upgrades this functionality providing 100% compatible arduino compile at the click of a button. An arduino boards list makes switching boards very easy
The initial release of the visual micro addin for visual studio is designed for arduino however it should be possible to use the system to program normal avr devices using visual studio. This is entirely untested but at the very leat this software will provide all the information and tools you need to adapt an avr solution.
Ignoring the arduino boards and library system you will find everything you need to adapt your own Visual Studio avr solution. AVR Intellisense, compilation, upload and much more
In the lestest product version the following functionality has been moved to the standard visual studio menus such as File>New or right mouse click project "New"
The "New" menu contains two very useful options enabling new files to be quickly added to an arduino visual studio project . This is a useful features if you often need to add a new .c and .h files to your projects.
note: To add files to your arduino projects in visual studio you can always use the standard visual studio "add file" or "add existing file" options.
Workflow Objective
Create a new .c file named MySubFile.c to the project (if it does not already exist) folder and link it to the project "Source Files" filter
Create a new .h file named MySubFile.h to the project folder (if it does not already exist) and link it to the project "Header Files" filter
Insert an #Include for MySubFile.h to the currently active source file (or .pde)
Open the new files for editing
How To
1. Choose to add .c/.h or .cpp/.h
2. Provide a name for the new files
3. Visual Micro does the rest!
The visual studio tool bar provides a way to select which arduino circuit board each project will use
When a board is selected, all of the items in the "_core" filter are removed and replaced by the files from the newly selected boards arduino core
If the _core filter does not exist then it is created. In the example below, the board is about to switch from "atmega168" to "arduino mega"
In the current visual micro version the include and source files are automatically separated into "inc" and "src" filters (see below)
The serial monitor is not included in the initial version of visual micro. Therefore the serial port need only be selected to upload to an arduino board using visual studio. An arduino serial port is select using the tool bar drop down menu as show below. When the project is next opened the addin will reselect the same port.
The serial ports menu is dynamic, the menu will detect changes to the connected serial port list of the computer (even whilst the menu is dropped down). The list is in order of device connection. These features are especially useful for device identification when working with multiple boards and ports
Example 1 from older software version
Example 2
Uploading will invalidate your arduino warranty, we accept no liablity should any problem arise from using this tool to upload to arduino
If Visual Studio 2005/2008 encounters a problem with an addin it will disable it by altering the addin xml.
To enable the addin again ensure the addin xml is in the "\document\visual studio x\addin\" folder, as per the installtion guide, and ensure the following settings are in the .addin xml
<LoadBehavior>5</LoadBehavior>
<CommandPreload>1</CommandPreload>
<CommandLineSafe>1</CommandLineSafe>
Editing any of the ardupilot versions using visual studio 2010 really shows off the quality of the ardupilot code. I love people who comment their code. Very neat!
And look how easy arduino project "navigation" is in Visual Studio, you can "Go To" the right place in the code.
I didn't know where the stabilize() function was but visual studio "Go To Definition" took me right to the attitude.pde. The intellisense in visual studio works best with well stuctured programs such as ArduPilot!
You need Visual Micro to make this work easily in 2010. It is free and quite new so the help system is a little confusing. Feel free to grab a copy.
The ardupilot code can't yet be compiled in visual studio due to the complex interaction between the multiple .pde files. However, Visual Micro adds a menu item to visual studio called "Open project in Arduino".which allows you to easily jump into the Arduino IDE to compile your mods. The next release of Visual Micro will allow compile and upload from within visual studio
The visual studio object browser simplifies browsing of arduino/wiring libraries, custom libraries and your own code.
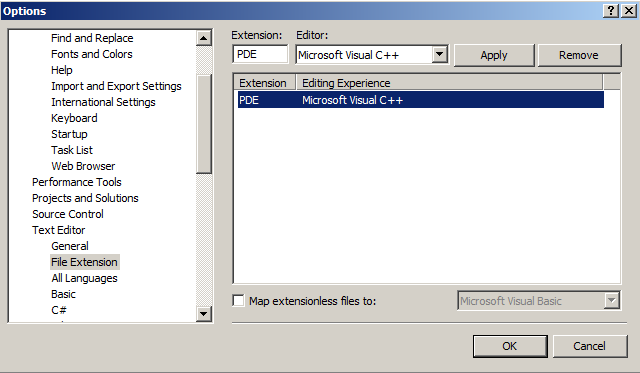
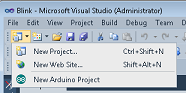
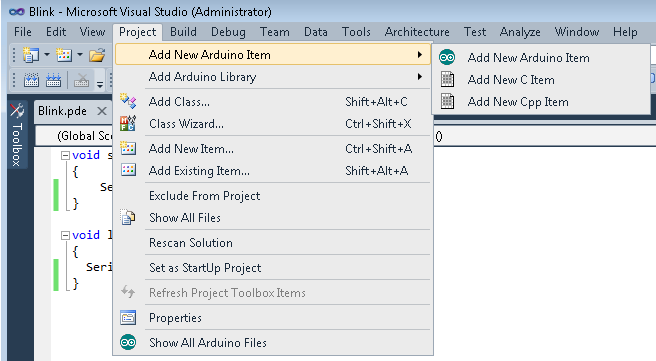
26 September 2011 - Finishing the user interface with a view to preventing the addin from cluttering the already busy visual studio interface. This means integrating our menu items into the standard Visual Studio menus.
For example:- File.Open,File.Add,Toolbar.Add New Item,Toolbar.Add New Project,Project.Add New Arduino Item,Project.Add Arduino Library,Project.Set Board,Project.Set Upload Using,Build.Project,Build.Solution,Debug.Start,ProjectExplorer...,SolutionExplorer...
The next version is a complete rewrite offering at least the same functionality offered by the Arduino development tool. The final work is to ensure that we are also Arduino1 compatible which includes support for the new Arduino file extensions.
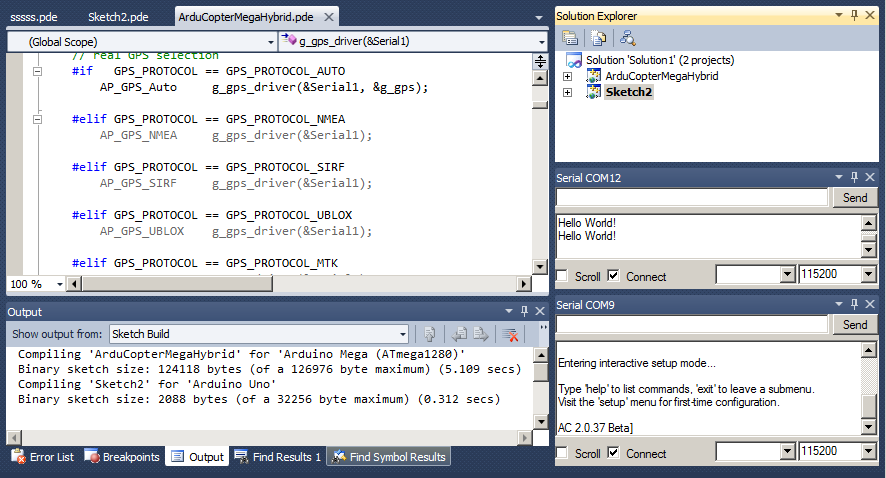
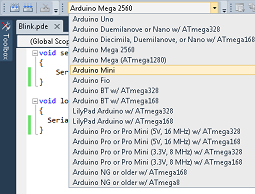
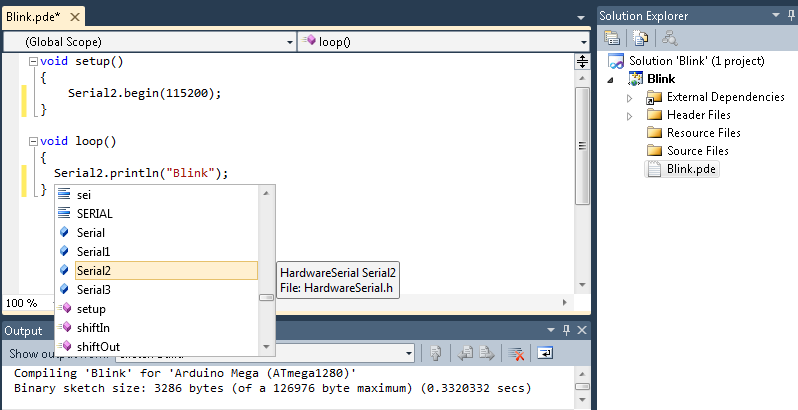
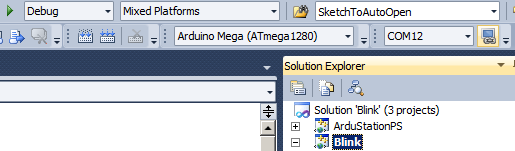
We now use standard visual studio commands such as F5 build and upload, double click goto error, simpler setup .The intellisense is complete and the compile/upload works fully. We can even burn new bootladers. Support for single or multiple solutions containing single or multiple sketches is included as standard. There is also a new api allowing arduino plugins to be created for other development systems.
The new version will be released over the next week. Please register in the forum if you would like to be notified when new versions are published.
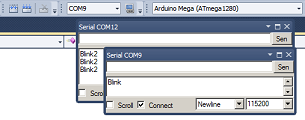
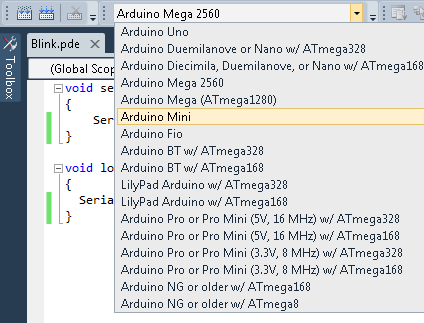
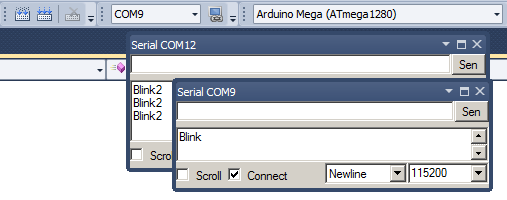
Version 2 Preview - Complete Clone of Arduino ++. Multi sketch, multi serial, high speed compile, full intellisense, simpler setup
NB: Initially for VS2010. A VS2008 version will also soon be released. Visual Studio Express is not supported
After installation sometimes the Arduino menu commands do not appear or the arduino menu /buttons commands appear multiple times. In this case you should close Visual Studio and re-start after ensuring that all "devenv.exe" processes have been terminated using "Windows Task Manager".
If the problem persists you can force the addin to repeat the Visual Studio procedure. This is done by performing a reset on the addin/plugin as described below. A "reset" removes all Arduino commands from Visual Studio so that after a clean start all the commands are setup in the correct way. If you have uninstalled the addin then after the re-start the commands will not re-appear.
Visual Studio (devenv.exe) provides a standard '/resetaddin' addin switch that can be used to easily reset or remove any addin. You will see in the example below that the /resetaddin switch required a key to identify the addin that is to be reset. The Visual Micro key is 'Visual.Micro.Visual.Studio.Arduino.Helper'
To reset the arduino addin, run visual studio (devenv.exe) with the same paramaters as your "Visual Studio" application short cut passing the following /resetaddin command.
[path to devenv.exe] /resetaddin Visual.Micro.Visual.Studio.Arduino.Helper
Alternatively or if the above fails then please follow the guide below:-
Depending on your security settings you might need to run Visual Studio as Administrator to either install or reset the arduino addin
NB: Microsoft have changed visual studio. The command prompt might now be available in the microsoft power tools extension
If you have uninstalled the addin then a reset will clean the Visual Studio interface removing customisations the addin makes during setup. After uninstall only the two arduino toolbars will remain which can be manually removed from Visual Studio using each tool bars' the right click context menu.
Removing a file from a Visual Studio project does not remove the file from the Arduino sketch. You have to follow the Arduino rules when working with Arduino projects in Visual Studio.
The Visual Studio Arduino compiler entirely mimics the Arduino development system which doesn't know about Visual Studio projects. The Arduino system uses all of the source code files in a folder.
So you must move or delete your unwanted Arduino source files.
Note
After removing files from a Visual Studio Arduino project, if you close and re-open the project, you will notice that the files you removed re-appear. This is because the Arduino for Visual Studio application validates Arduino projects when they are opened (applying the Arduino rules). The intention is to ensure compatibility with the Arduino development tool allowing you optionally compile sketches in either product.
The Arduino IDE for Visual Studio is designed for users who already understand how to use the basic Arduino IDE. The Arduino for Visual Studio add-in provides many ways to create, manage, compile and upload Arduino sketch programs using Visual Studio. The add-in extends the Visual Studio menus and tool bars by providing easy to use options that ensure your sketch programs adhere to the Arduino rules.
When testing a new installation of the Arduino IDE for Visual Studio, to avoid confusion, the Arduino commands in Visual Studio should be used in preference to standard visual studio commands. If you are new to both Arduino and to Visual Studio then you MUST use the Arduino commands because you won't know the Arduino rules. You will see that the Arduino commands have an Arduino icon next to them.
First Time User Guide
The following are a few ways to test your Arduino for Visual Studio installation
Method A - Create new arduino sketch (automatic mode)
Open visual studio. From the "File>New" menu select "Arduino project". When prompted, enter the name of a new arduino sketch such as "MyFirstSketch". Click OK
You should see a new arduino project is created containing an arduino sketch called MyFirstSketch.pde
Add your own arduino code to the void loop() {}
Select an arduino board from the list and click "Build Solution" from the "Project" menu
You should see a successful arduino compile in the "Sketch Build" output window
Tip: The same functionality is available from the Visual Studio "Standard" tool bar and also the "Solution Explorer" context menu
Method B - Open an existing sketch (automatic mode)
In visual studio select "File>Open" then click "Arduino Project". You will be presented with an "Open File" window which will display your arduino sketch folder. Select a sketch and click OK.
A project will be automatically created for the sketch and the arduino source codes automatically added to the project.
Add your own arduino code to the void loop() {}
Select an arduino board from the drop down list of boards and click "Build" solution from the "Project" menu
You should see a successful arduino compile in the "Sketch Build" output window
Method C - Open an existing sketch (semi automatic mode)
In Visual studio selected "File>Open>File". Navigate to an arduino sketch folder and select a .pde file. Click OK
You will be asked if you would like to Open or Create a project for the arduino sketch. Click OK.
Add your own arduino code to the void loop() {}
Select an arduino board from the drop down list of boards and click "Build" solution from the "Project" menu
You should see a successful arduino compile in the "Sketch Build" output window
Method D - Creation of a new arduino project (manual mode)
In Visual Studio create a new empty C++ project called "MySketch3" in a folder called "MySketch3"
Add a new text file to the project and call it "MySketch3.pde"
Add your own arduino code to the void loop() {}
Select an arduino board from the boards list
Select an arduino board from the drop down list of boards and click "Build" solution from the "Project" menu
You should see a successful arduino compile in the "Sketch Build" output window
This product is not "associated to" or "endorsed by" Arduino. The design of the sketch compiler and uploader is directly based on the arduino source code
Visual Studio dockable serial tool windows can be used for arduino and for many other applications.
The arduino boards' serial tool window will automatically pause during an arduino serial upload
The Visual Studio "Tools" menu example below is taken from a machine that did not have a connected serial port.
"Show all arduino files" is for advanced users who would like the arduino core and "selected libraries" source codes included in the Visual Studio solution
The Visual Studio "Tools" menu example below is taken from a machine that did not have a connected serial port.
Due to a VS bug 10.11+ versions require you to manually tell visual studio to color code your arduino code.
1. Open the Visual Studio Tools>Options
2. Navigate to Text Editor>File Extensions
3. Add the INO and PDE extensions setting the Editor to "Microsoft Visual C++" for each
4. Click OK and re-open any open sketch code files
This is what you should see once you have made the changes
Note: Users of versions earlier than 10.11 who encounter random color code failings should remove the extensions from the above list. Click OK and then re-add them as shown above